Showing posts with label Patterns. Show all posts

Friday, February 01, 2008

Micah’s Hacky Sack

All right after getting all my grad applications in the mail (It sounds so simple but yet so worrisome). And having back problems again, I have not been on top of my game lately. I’ve also caught the sewing bug and I have not even made a bookmark for a while oh well. Here is the Hacky sack pattern that after many tries and retries I finally ended up with.


Micah’s Hacky Sack

(For stripes change color every three rounds, at the end there will be four rounds in the last color to finish the hacky sack off)

You Need:
Hook: Size 5
Thread: Size 10
Poly Pellets

Create magic loop
Rnd 01: In lp make 11 sc. (11 sc)
Rnd 02: 2 sc in each sc around. (22 sc)
Rnd 03: [1 sc in next sc, 2 sc in next sc] around. (33 sc)
Rnd 04: 1 sc in next sc around. (33 sc)
Rnd 05: [1 sc in next 2 sc, 2 sc in next sc] around. (44 sc)
Rnd 06: 1 sc in next sc around. (44 sc)
Rnd 07: [1 sc in next 2 sc, 2 sc in next sc] 14 times, 1 sc in next 2 sc. (58 sc)
Rnd 08: 1 sc in each sc around. (58 sc)
Rnd 09: 1 sc in each sc across till 3 sc remain, 2 sc in next sc, 1 sc in next 2 sc. (59 sc)
Rnd 10: [1 sc in next 6 sc, 2 sc in next sc, 1 sc in next 6 sc, sk next sc, 2 sc in next sc] 3 times, [1 sc in next 6 sc, 2 sc in next sc] 2 times. (64 sc)
Rnd 11: 1 sc in each sc around (64 sc)
Rnd 12: 1 sc in each sc around (64 sc)
Rnd 13: 1 sc in each sc around (64 sc)
Rnd 14: 1 sc in each sc around (64 sc)
Rnd 15: 1 sc in each sc around (64 sc)
Rnd 16: 1 sc in each sc around (64 sc)
Rnd 17: 1 sc in each sc around (64 sc)
Rnd 18: 1 sc in each sc around (64 sc)
Rnd 19: 1 sc in each sc around (64 sc)
Rnd 20: 1 sc in each sc around (64 sc)
Rnd 21: 1 sc in each sc around (64 sc)
Rnd 22: 1 sc in each sc around (64 sc)
Rnd 23: 1 sc in each sc around (64 sc)
Rnd 24: 1 sc in each sc around (64 sc)
Rnd 25: sk 1st sc, [1 sc in next 6 sc, sk 1 sc] 8 times, 1 sc in next 5 sc, sk 1 sc, 1 sc in next sc. (54 sc)
Rnd 26: 1 sc in 3 sc, sk 1 sc, sc in rest of the sc around. (53 sc)
Rnd 27: 1 sc in next 3 sc, sk 1 sc, [1 sc in next 5 sc, sk 1 sc] 8 times, 1 sc in next sc. (44 sc)
Rnd 28: 1 sc in next 44 sc. (44 sc)
Rnd 29: 1 sc in next 5 sc, sk 1 sc, [1 sc in next 4 sc, sk 1 sc] 7 times, 1 sc in next 3 sc. (36 sc)
Rnd 30: 1 sc in all sc around. (36 sc)
Rnd 31: 1 sc in next 4 sc, sk 1 sc, [1 sc in next 3 sc, sk 1 sc] 2 times, 1 sc in next 2 sc, sk 1 sc, [1 sc in next 3 sc, sk 1 sc] 5 times, sk last sc. (27 sc)
Rnd 32: [1 scin next 2 sc, sk 1 sc] around ending with 1 sc empty. (18 sc)
Rnd 33: [1 sc in next 3 sc, sk 1 sc] 2 times, 1 sc in next 2 sc, sk 1 sc, 1 sc in next 3 sc, sk 1 sc, 1 sc in next 2 sc, sk 1 sc, 1 sc in next 3 sc, sk 1 sc, 1 sc in next 2 sc, ending with 1 sc unworked. (13 sc)
Rnd 34: sc in every other sc around, plus one into next round. Fasten off and weave in ends.

Any errors or suggestions please let me know @ ajsblu_eyes@cox.net

Sunday, September 09, 2007

Spike Tissue Holder

Since I do not own the stitch style I used, I am substituting a different spike stitch variations to what I used. There is a Spike Stitch Introduction that also will be helpful if you are unfamiliar with this stitch.
Spike Tissue Holder

Materials:
Thread Size 10 thread in 2 colors: Color 1 – black, Color 2 – pink
Hook Size 9 Steel (it has been a while since I have done this so I think this is the right hook)
Needle threader
Needle
Sewing Thread
3 Clasps


Make 2:
With color 1, Ch 62
1. Sc in 2nd ch from hk & all following sc.
2. (ch 1, turn, sc in all sc.
3. ch 1, turn, sc in all sc.
4. ch 1, turn, sc in all sc (change to color 2).
5. use directions from row (B) 7 but only for 7 times not the 8 times it says to.
6. ch 1, turn, sc in all sc.
7. ch 1, turn, sc in all sc.
8. ch 1, turn, sc in all sc.
9. ch 1, turn, sc in all sc (change to color 1).
10. use directions from row (A) 13 but only for 7 times not the 8 times it says to.
11. ch 1, turn, sc in all sc.)
12. repeat from ( to ) 3 times.
13. [ch 1, turn, sc in all sc.] repeat 12 times. With color 1 “the starting color”5. use directions from

When that is done you will have two halves, next connect the two sections with a sl st in each st across.

This joining will create a small joining bump. Get your small packet of tissues place it in the middle of your crocheted rectangle. Crab stitch along the sides the arrows are pointing to. (The red line is the sl st joining the two halves)

This is how it should look, then take the two edged and fold them over the tissue packet like you were wrapping a present. (White rectangle depicts where the tissue packet will go)


This is what you should see. Next crab stitch along the sides the arrows are pointing to. (The edges are folded like you would wrap a present with wrapping paper)

At this stage your tissue holder should look like the below picture except the middle edges pull away and you can see the tissue packet inside.

Finally you'll add fasteners with thread to the center seam so it will remain closed. I used 3, these clasps are invisible on the outside of the tissue holder. The red dots show the placing I used for the clasps. (The clasps should be attached on the inside of the tissue holder)

This is picture of clasp that is similar to what I used.

Your tissue holder should look like this now but the spike stitch pattern will be different.

This is the book that I borrowed that has the Spike Stitch pattern that I used for this pattern. If you have this book or can borrow this book, below is the pattern you use with it .
Make 2:
With color 1, Ch 62
1. Sc in 2nd ch from hk & all following sc.
2. (ch 1, turn, sc in all sc.
3. ch 1, turn, sc in all sc.
4. ch 1, turn, sc in all sc (change to color 2).
5. ch 1, turn, sc in next 4 st, *Spike Stitch in all indicated stitches, sc in next 7 sts*, repeat from * to * 6 times, sc in last 4 sts.
6. ch 1, turn, sc in all sc.
7. ch 1, turn, sc in all sc.
8. ch 1, turn, sc in all sc.
9. ch 1, turn, sc in all sc (change to color 2).
10. ch 1, turn, sc in next 8 st, *Spike Stitch in all indicated stitches, sc in next 7 sts*, repeat from * to * 6 times, sc in last 8 sts.
11. ch 1, turn, sc in all sc.)
12. repeat from ( to ) 3 times.
13. [ch 1, turn, sc in all sc.] repeat 12 times. With color 1 “the starting color”
Next go up to the top of this page and follow the rest of the steps.

Wednesday, July 25, 2007

Owl Pattern

In honor of the last Harry Potter book I made this bookmark:


Materials:
Black crochet thread size 10
White crochet thread size 10
Steel crochet hook, size 9 USA (1.40 mm)

Finished Size: 2 ½" Height x 2" Width (at widest point) Tassel not included

Skill Level: Medium

Eyes (make 2)
Rnd 1: With black, ch 2, 6 sc in 2nd ch from hook, join in beginning sc, fasten off. (6 sc)
Rnd 2: Attach white in any st of Rnd 1, ch 2, 1 dc in same stitch, 2 sc in each sc around, join in 2nd ch of initial ch 2, and fasten off. (12 dc)

Eye Joining & Beak
Place both completed eyes together with the right side facing out for both eyes. With black, sl st through both sets of dc, sc in same st and in the next 2 dcs. Then fold out eyes so both are seen, sc in same st on the right eye, sc on the left eye, ch 3 sl st in the last sc which went through both eyes. Fasten off.

Head
With wrong side facing you, sl st into the st next to beak, ch 2, *2 dc in next st, dc into next st* repeat *to* 4 times, 2 dc into the section above “eye joining & beak” dc into the next st on the 2nd eye, repeat * to * 4 times then place 2 dc into the black just under the beak, join with initial ch 2. Do not fasten off.

Body
Row 1: Sl st in the next 2 sts, ch 3 turn, dc in same st, ch 1, (dc, ch 1, dc) in the next stitch, dc dec over next 2 sts, ch 1, dc dec over next 2 sts, (dc, ch 1, dc) in the next stitch, ch 1, (dc, ch 1, dc) in the next stitch, ch 1, turn.
Row 2: Sl st in the ch 1 space, ch 3, dc in same st, ch 1, skip the next ch 1 space, *into the following ch space (dc, ch 1, dc)*, repeat * to * 2 times more, ch 1, (dc, ch 1, dc) into the last ch 1 space of the following row, turn.
Row 3: Repeat row 2.
Row 4: Sl st in the ch 1 space, (ch 3, 2 dc) in same st, ch 1, skip the next ch 1 space, *into the following ch space (3 dc)*, repeat * to * 2 times more, ch 1, (3 dc) into the last ch 1 space of the following row, turn.
Row 5: Sl st in the middle dc, (ch 3, 2 dc) in same st, ch 1, *(3 dc) in the next middle dc*, repeat * to * 2 times more, ch 1, (3 dc) in the middle dc, turn.
Row 6: Repeat row 5.
Row 7: Sl st in the middle dc, (ch 3, 3 dc) in same st, ch 1, *(4 dc) in the next middle dc*, repeat * to * 2 times more, ch 1, (4 dc) in the middle dc, fasten off.

Edging
Sc in the last 2 dc of Row 7,
*Ch 1, sc in the last dc’s post, sc in middle dc of row 6.
Ch 1, sc in the next dc post, ch 1, sc in the middle dc of row 5,
Ch 1, sc in the next dc post, ch 1, sc in the middle dc of row 4,
Ch 1, sc in the next dc post, ch 1, sc in ch 1 sp of row 3,
Ch 1, sc in the next dc post, ch 1, sc in ch 1 sp of row 2,
Ch 1, sc in the next dc post, ch 1, sc in ch 1 sp of row 1,*
Ch 1, sc in each st around head to the neck of the other side. Repeat from * to * in reverse from row 1 to row 6.
Ch 1, sc in each of the next 4 dc, sl st into the ch 1 sp, [*ch 2 turn to sl st in the ch 1 space of the previous round* repeat this step 6 times from * to * then, (ch 2 turn to sl st in the ch 1 space of the round in the next round) repeat this step 5 times from ( to ), ch 2, then sc in the next dc,] sc in the next 3 dc, in the area between the 2 sets of 4 dcs make 3 dcs, sc in the next 4 dcs, in the area between the 2 sets of 4 dcs make 3 dcs, sc in the next 4 sts, repeat from [ to ] once, sc in the last st then join with the 1st sc, fasten off.

Tassel
Cut 4 long equal lengths of thread about 14 inches, then fold in half & loop through the middle of the 2 sc on the bottom of the owl, pull the loops partially through the 2 sts, pull free ends through the created loop, pull to tighten. Trim ends.

If you find any errors please email me at ajsblu_eyes@cox.net

I came up with this pattern on my own so be nice and respect the copyright. I am alright with you giving this as a gift but do not sell the pattern or product, or use my pics and calling them yours is not allowed either.
Copyright © 2007 by Ashley Makins. All Rights reserved.

Sunday, February 11, 2007

Anatomical Heart Bookmark Pattern

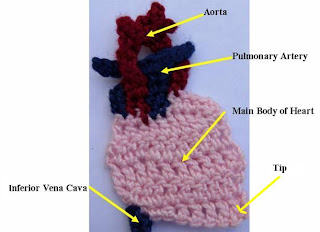
Anatomical Heart Bookmark

Seeing as Valentines Day is right around the corner I thought I would share this.

Materials
Thread Size 10 thread in 3 colors: Color 1 – pink, Color 2 – red, Color 3 – blue small amounts of each.
Hook Size 8 boye or 1.50 mm
Needle threader
Needle


Main Body of Heart

**Note: do not fasten off, or cut thread unless directed to do so.
* Change colors the way depicted here: http://crochet.about.com/library/weekly/aa072697.htm

Row 01: (With color 1) Ch 10, turn.
Row 02: Dc in 3rd ch from hk, 1 dc in the next 4 sts, 1 hdc, 1sc, 1sl st, ch 3, turn. (8 stitches)
Row 03: Sl st in 2nd ch from hk, 1 hdc in next ch, 1 dc in the next 8 sts, ch 2, turn. (10 stitches)
Row 04: 1 dc in the next 10 sts, ch 2, turn. (10 stitches)
Row 05: 1 dc in the next 10 sts, ch 1, turn. (10 stitches)
Row 06: Sc in 1st st, 1 hdc in next st, 1 dc in the next 4 sts, 1 hdc in the next 4 sts, ch 1, turn. (10 stitches)
Row 07: (Drop the thread when changing color) 1 sc in next 2 stitches, (change color to color 2, though thread color 1 along) sc in next stitch, (change color to color 3, though thread color 1 along) 1 sc in next 2 stitches, (change to color 1) 1 sc in next 3 stitches, 1 sl st in next 2 stitches, ch 1, (pic shown is before the turn), turn.
Row 08: (in this row you can pull up the dropped thread from the previous row) Sl st in 2nd st (skipping 1st stitch), sl stitch in next 2 sts, 1 hdc in the next st, (change color to color 3, cut thread of color 1, can weave in later) 1 hdc in the next 2 sts, (change color to color 2, cut thread of color 3, can weave in later) 1 hdc in the next 2 sts, (change color to color 3) 1 hdc in the next st, ch 2, turn.
Row 09: 1 hdc in next st, (change color to color 2 cut thread of color 3, can weave in later) [1 hdc, 1 dc] in next st, 1dc in next st, ch 2, (pic shown is before the turn), turn.
Row 10: skip 1st st, dc in next st, turn. (continue to the aorta instructions)

Aorta
Row 11: Ch 2, sc in next st, ch 1, turn.
Row 12: 1 sc, 1 dc in ch 1 of previous row, ch 3, turn.
Row 13: Sl st in 1st st, ch 2, 1 sc in previous row’s sc, 1 sl st in same st, ch 1, turn.
Row 14: 1 sl st in previous row’s sl st, 1 dc in previous row’s sc, ch 3, turn.
Row 15: Sl st in 1st st, ch 3, sl st in same st, ch 2, 1 dc in last st, ch 2, turn.
Row 16: Sl st into st right next to the pulmonary artery (the middle 2 blue stitches in the middle of the heart, which the green arrow is pointing to), dc in the last st of the previous row, then sl st into the stitch next to the previous sl st on the pink side not the blue side (the place the purple arrow is pointing to). Finish off.


Pulmonary Artery – With tip of heart pointed to the left
Row 1: (With Color 3) attach with sl st to 1st blue st, ch 2, dc in next st, ch 1, turn.
Row 2: 1 sc in the next 2 sts, ch 6, in 2nd ch sc & in the next 4 chains, 1 sc in next 2 sc, sl st down to the previous row, ch 4, sc in 2nd ch & the next 2 chains, sl st in next 2 sc.

Inferior Vena Cava
Row 01: On the free lp on the base of the 1st ch made attach color 3 with a sl st, 1 sc in same st, in 2nd free lp 1hdc, sl st in same lp, ch 2, turn.
Row 02: 1 dc in the last st, turn.
Row 03: Ch 4, sl st in the top of ch 2, to create a lp, fasten off.

TasselCut 4 strands of blue, each about 10 inches long, With all strands held together fold in half, insert hook in ch 4 lp at the base of Inferior Vena Cava, pull fold through sp, pull all loose ends through fold. Tighten; trim ends.


Pic is before veins are added
Veins
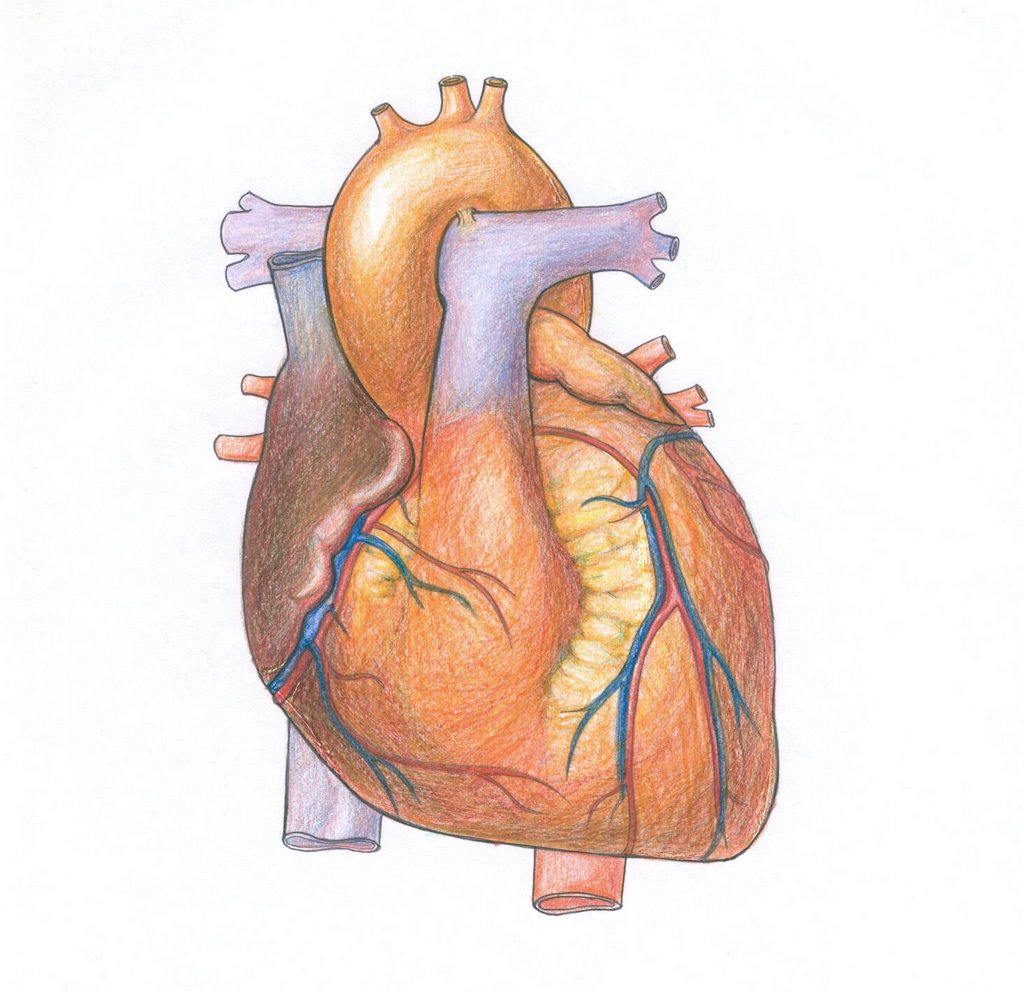
Thread needle with red thread then copying a similar pattern as seen in
this picture, add veins with red. Do similar with the blue thread, fasten all threads off.

I came up with this pattern on my own so be nice and respect the copyright. I am alright with you giving this as a gift but do not sell the pattern or product, or use my pics and calling them yours is not allowed either.

Copyright © 2007 by Ashley Makins. All Rights reserved.