Monday, December 29, 2008

Dragon Bag

Alright since it has been so long since I have last posted I have decided to do many small posts to catch up on my recent and not so recent projects. The only thing I am going to say about my long silence is that work is harder then being in college and more time consuming.

I came across this book a while back in my public library and instantly fell in love with it. I love fanciful creatures in books so it is no surprise I like them in quilts. I decided to make the dragon shown in this book with leftover scraps.

It took me a day to cut out the pieces from fabric, and then it took a day to assemble the dragon. I was left wondering what to do with this dragon.

Many months later while in a quilt shop with my mother she came across a bag that said there was going to be a class to make the bag. She instantly decided she wanted to go to the class. I was then told that there needed to be four people to make the class a large enough size for it to take place. My mom stated to give me the look that says, “you want to make this bag don’t you!”. I eventually agreed and decided to make the dragon patch into this bag.

I ended up with this as my final product. I did not pre wash the red material though and was worried that it would run into the dragon part. After much sweating, and fabric treating the bag turned out fine.

Here is the back side of the bag.

Here is a look into the bag; I couldn’t resist using it before I got my pictures.

Well by now you might be wondering what did your mom’s bag turn out like. Here is her version.

Wednesday, July 23, 2008

Aprons & More Aprons

Alright I have another fixation I am currently on. Aprons why you may ask? Aprons have been popping up everywhere & with that occurrence I can’t help finding some cute ones. It all started with one magazine.


I found 3 cute apron patterns in it. First the Cottage-Inspired Apron

Next the Easy Retro Apron,

& finally the Pretty Paisley Apron.

I wanted to make all three but there was only one apron pattern to cut out in the magazine & I needed 3 different styles out of the one paper which would not work so I took the original pattern to Kinko’s and copied it a couple times. Later found these same patterns online. Oh well, I had already made my version of the Pretty Paisley Apron

This is my version of the Cottage-Inspired Apron which I made for my mother’s birthday.

After I finished these I was at a newly opened fabric store & saw this lovely apron with five pockets the perfect apron for crafting of any variety. But they didn’t have the pattern & I didn’t want to take the time to fiddle with fabric to figure out the pattern. So I kept checking back at the store & finally the store got the pattern in. Here is a picture of the apron at the store.

Here is the pattern picture.

I promptly made a couple. This was the first.

When I finished this one my mother tried it on and said she liked her apron. I then told her she could keep it if she really wanted it.

This I made in conclusion but I might make more. I like the five pockets.

I somewhere around this time was telling my grandmother about my recent fascination with aprons & she showed me some of her old aprons & I thought I might duplicate one of her very practical aprons.

This was my first attempt to duplicate an already made article, here is the final product. I will show a picture of the original after I replace the buttons with new ones. The great thing about this apron is that it has great coverage for the down & dirty jobs.
Oh the reason I have not been posting as regularly is that I had a lot going on. I just graduated, my brother just graduated, had 2 vacations, I had to obtain a special job certification for my new job that I just got hired for. I am currently commuting 1 ½ hrs daily to my job & I’m learning what needs to be done for that job, so please be patient with my less than regular posts.

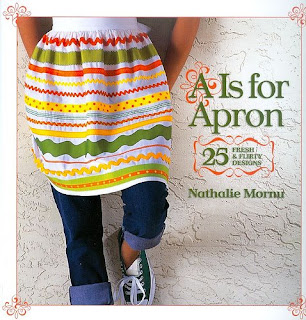
If that was not enough I came across this wonderful book at my local bookstore. I promptly bought it for some light reading. You might be seeing some more aprons in the not so near future.

Friday, May 23, 2008

Bookmark, Coasters, & Sunglasses Case

I have been extremely busy lately I graduated a couple weeks ago. That was the beginning of the craziness. Since I did not get into graduate school I looked into how I could use my bachelors’ degree. I can work in the school system as a Speech Language Assistant or as a Speech Language Technician. To do the Assistant work I don’t have to do anything but do as the Speech Therapist says. But to do the Technician job I have a laundry list of to do items, why do that job then it pays more and sounds more interesting. So I am scrambling to obtain 150 observation hours with a certified Speech Language Pathologist (a speech therapist). I have had hardly any time to think. The projects below were made a while ago not recently.


This is a Lacy Clover Bookmark I obtained the pattern from Ccat’s website. I love her patterns; I have not been timely about presenting the final product though, sorry Ccat.


This is a sunglasses case if you didn’t recognize it. Since my mother admired my previous sunglasses case I made this for her for mother’s day. See these really were made a long time ago. Hopefully you noticed the hearts; I had to utilize the heart pattern from a large book of quilt patterns and change the heart pattern into a sunglasses case.

These are coasters; I actually made about 20 of these out of scrap fabric. I gave these to various people. I decided to utilize my scrap stash.

Here is a view from the back of the coasters.

This is a swan barometer; the beak is still open so the yellow water could come out if tipped just right. I obtained this barometer in my Materials & Civilization class in the glass blowing area on the Arizona State university campus. The swan started life as a tube. This glass blowing place normally makes glass tools for the chemistry students. I obtained this from my professor; I greatly wanted it so when he offered me it I jump to get it.

Saturday, April 05, 2008

Sorry it has been so long since my last post a lot has happened since them. I currently am on a sewing binge I every so often get obsessed in one of the number of crafts I have taken classes in and am now obsessed with sewing. I found this lovely corduroy fabric at Wal-Mart


I decided I wanted to make a circular needle case to take out my few of those types of needles from the drawer in which I kept them.

Here is a view of the right side of the needle album.

Here is the right side of the above view.

Here is the case flipped two pockets to the right.

Here is the opposite of the 3rd picture.

As you have seen when I make one I feel like making another. I picked up the fabrics of the next needle case from Michaels what few fat quarters they have.

Now in this picture you can see from each different pattern on the fabrics where the pockets are.

I had to show you the inner two pockets.

And the view of more pockets.

Here is a larger view of the whole.

Since in the sewing mood I made this Crochet hook case for the few hooks that didn’t fit in my other two cases.

Here it is unrolled; I just love this bright fabric.

This is a sun glasses case I made out of scraps from the Circular Knitting Needle case above.

Here is a close up of the opening where I added snaps.
And the other side of the snaps.

I also have been inspired to finish up some of the projects I have laying around uncompleted. I had originally 15 incompletes on my list and I am down to nine, although I have thrown in some projects not on the list purely for the fun of it.

I have to mention I am graduating from my undergraduate degree in May unfortunately I was not accepted into the Speech programs where I have applied for my Masters degree. And I can’t be a speech therapist till I get that degree. Despite this development I am determined to reapply after working in the speech field as a technician for a year.

Friday, February 01, 2008

Micah’s Hacky Sack

All right after getting all my grad applications in the mail (It sounds so simple but yet so worrisome). And having back problems again, I have not been on top of my game lately. I’ve also caught the sewing bug and I have not even made a bookmark for a while oh well. Here is the Hacky sack pattern that after many tries and retries I finally ended up with.


Micah’s Hacky Sack

(For stripes change color every three rounds, at the end there will be four rounds in the last color to finish the hacky sack off)

You Need:
Hook: Size 5
Thread: Size 10
Poly Pellets

Create magic loop
Rnd 01: In lp make 11 sc. (11 sc)
Rnd 02: 2 sc in each sc around. (22 sc)
Rnd 03: [1 sc in next sc, 2 sc in next sc] around. (33 sc)
Rnd 04: 1 sc in next sc around. (33 sc)
Rnd 05: [1 sc in next 2 sc, 2 sc in next sc] around. (44 sc)
Rnd 06: 1 sc in next sc around. (44 sc)
Rnd 07: [1 sc in next 2 sc, 2 sc in next sc] 14 times, 1 sc in next 2 sc. (58 sc)
Rnd 08: 1 sc in each sc around. (58 sc)
Rnd 09: 1 sc in each sc across till 3 sc remain, 2 sc in next sc, 1 sc in next 2 sc. (59 sc)
Rnd 10: [1 sc in next 6 sc, 2 sc in next sc, 1 sc in next 6 sc, sk next sc, 2 sc in next sc] 3 times, [1 sc in next 6 sc, 2 sc in next sc] 2 times. (64 sc)
Rnd 11: 1 sc in each sc around (64 sc)
Rnd 12: 1 sc in each sc around (64 sc)
Rnd 13: 1 sc in each sc around (64 sc)
Rnd 14: 1 sc in each sc around (64 sc)
Rnd 15: 1 sc in each sc around (64 sc)
Rnd 16: 1 sc in each sc around (64 sc)
Rnd 17: 1 sc in each sc around (64 sc)
Rnd 18: 1 sc in each sc around (64 sc)
Rnd 19: 1 sc in each sc around (64 sc)
Rnd 20: 1 sc in each sc around (64 sc)
Rnd 21: 1 sc in each sc around (64 sc)
Rnd 22: 1 sc in each sc around (64 sc)
Rnd 23: 1 sc in each sc around (64 sc)
Rnd 24: 1 sc in each sc around (64 sc)
Rnd 25: sk 1st sc, [1 sc in next 6 sc, sk 1 sc] 8 times, 1 sc in next 5 sc, sk 1 sc, 1 sc in next sc. (54 sc)
Rnd 26: 1 sc in 3 sc, sk 1 sc, sc in rest of the sc around. (53 sc)
Rnd 27: 1 sc in next 3 sc, sk 1 sc, [1 sc in next 5 sc, sk 1 sc] 8 times, 1 sc in next sc. (44 sc)
Rnd 28: 1 sc in next 44 sc. (44 sc)
Rnd 29: 1 sc in next 5 sc, sk 1 sc, [1 sc in next 4 sc, sk 1 sc] 7 times, 1 sc in next 3 sc. (36 sc)
Rnd 30: 1 sc in all sc around. (36 sc)
Rnd 31: 1 sc in next 4 sc, sk 1 sc, [1 sc in next 3 sc, sk 1 sc] 2 times, 1 sc in next 2 sc, sk 1 sc, [1 sc in next 3 sc, sk 1 sc] 5 times, sk last sc. (27 sc)
Rnd 32: [1 scin next 2 sc, sk 1 sc] around ending with 1 sc empty. (18 sc)
Rnd 33: [1 sc in next 3 sc, sk 1 sc] 2 times, 1 sc in next 2 sc, sk 1 sc, 1 sc in next 3 sc, sk 1 sc, 1 sc in next 2 sc, sk 1 sc, 1 sc in next 3 sc, sk 1 sc, 1 sc in next 2 sc, ending with 1 sc unworked. (13 sc)
Rnd 34: sc in every other sc around, plus one into next round. Fasten off and weave in ends.

Any errors or suggestions please let me know @ ajsblu_eyes@cox.net

Monday, January 14, 2008

Snowflakes, Hacky Sacks, Sewing...

Ok here I go. “A number of months ago I came across a book by Delsie Rhoades called 101 Snowflakes at my local library. I borrowed it and started making snowflakes.” You remember that from last post this time I have more I made but had not yet taken pictures of. Here is #1 from that book. All the following I made for my mother, she said she wished she had more of my snowflakes, which I was giving away as Christmas presents. Some of the snowflakes below were a finials project one of many I started around finals.
This is #3 from the book.

This booklet is the one I got the below angel pattern form.

This angel pattern from a booklet called Angels, Snowflakes, & Garlands designed by Anne Halliday. I looked around specifically for angel patterns because they are what my mother collects. I made 4 of these angels as gifts this year.

This is #8 in white; I made this one in gold first.

While searching for angel ornament patterns I came across this used booklet I bought it.

And here is the only ornament I have made from it so far.

And this is #27 from the book by Delsie Rhoades called 101 Snowflakes.

And another # 14, that I made in gold for my Aunt and my mother really admired it so I made another in white.

And another #28.

And another # 61, you can see I really went to town on snowflakes this year.

I made # 33 for one of the girls I watch and it was too small in her estimation so I made her a different one. This was the second of this number I had made.

# 84 I love this one it is very delicate looking, well I love all of them really.

And last but not least # 88, which I made two of as well. All the snowflakes in this post went to my sweet mother.

Ok on to other things now I come to my brother who loves to play with these. He had asked me once if I would make him some more and I told him it was cheaper to buy them at $3 a piece than to spend the time it would take to make them. So all of these he purchased himself except the red one which is really the Psychotic Tomato designed by Regina Rioux Gonzalez aka Lady Linoleum.

I after many, many, many, trials of other peoples hacky sack patterns and they were not the right size or look right…. I proceeded to copy one of the existing hacky sacks my brother bought. And finally I got the first striped one.

After that I proceeded to make another striped one.

Then feeling like a change I was going to make a pokadoted yellow and black one but the pokadots were so time consuming I made only two stripes of yellow pokadots on black. Resulting in the below ball.

Next I decided to go full force and make pokadots, as one of my brother’s other hacky sacks had. This was very time consuming. I was also stealing away my brother’s hacky sacks so I could try to imitate them, thankfully I was not caught and my brother loved the hacky sacks when he got them on Christmas and very surprised.

These below pajamas were also another finals project I decided I would make around finals, like I had time to do that no. I didn’t finish these till January.

Another set of pajamas, I have to tell you they are so soft it is like one of those super soft stuffed animals but all over when I wear them.

Yet another project was this sewing pincushion trash bag set. My mother has one and it makes her sewing projects so nice the bag is for thread clippings as you sew or other fabric trash. The pincushion is for when you take out the pins as you sew.

Here is a picture of it on the wrong side of the serger machine. It is supposed to go on the right side.

After I made one I proceeded to make another out of remnants from my flannel quilt. It is more fun the second time through a pattern and quicker at least for me.

This thread was sitting in my thread bin annoying me for it was to thick for my normal thread work and to thin for yarn so I whipped out my new Crochet magazine and made Sunny Spread Squares out of it. These are all the squares I could make before the thread ran out. I feel much better about having these squares in my bin than that thread.

Oh here is a picture of the magazine I got the pattern out of.

Now my crochet hooks have a nice case to hold them but my knitting needles do not so I found the below pattern and made a Knitting needle case.

And here is what I ended up with; I received the most compliments from the male members of my family than I had ever received before. You see they liked the camo fabric which I got because it was a remnant and on sale. It was really gratifying I’ll have to make something in camo again soon.

And here is what I ended up with; I received the most compliments from the male members of my family than I had ever received before. You see they liked the camo fabric which I got because it was a remnant and on sale. It was really gratifying I’ll have to make something in camo again soon.

I’ve been bitten by the sewing bug so I bought some more fabric to match the brown ribbon I had from the camo knitting needle case.

I was able to make not one but two more knitting needle cases because I didn’t have to make the extra crochet hook flap so on the first case I had brown on the outside.

Here is the inside.

And I made the second case blue on the outside.

Here is a peek inside it.

With how crafty I have been lately I needed more storage so I bought some plastic storage bins to store and spread out what I have. And that concludes this post I’m glad aren’t you?